Showing posts with label javascript. Show all posts

Node.Js How to Get Shipping Route Using OSRM API

December 16, 2019 Add Comment

It's been quite a while I didn't post anything. Well sorry, because I have to do my endless project and university tasks. In this article, I will be sharing my current small project using OSRM API.

Well, I assume that you may have already known what OSRM API is (because I guess it what leads you here). as a short introduction, OSRM API is an opensource API that lets developers get the distance, the needed time between "from (home, for example) and to (destination, for example)". 

Node.Js How to Get Shipping Route Using OSRM API


For instance, in my home town, there are 3 post offices (po-A, po-B, po-C), I wanna know the fastest route and time required from my home - which post office has the shortest way or less time required. For developer, to overcome this problem, OSRM can be the answer, because it is totally free and opensource (of course).

According to WIkipedia , The Open Source Routing Machine or OSRM is a C++ implementation of a high-performance routing engine for shortest paths in road networks. Licensed under the permissive 2-clause BSD license, OSRM is a free network service. OSRM supports Linux, FreeBSD, Windows, and Mac OS X platform.

So, it is so much like Google Maps. Yes, it is actually so much like Google maps. However, it's free

Usually, OSRM API is used by shipping project, and traveling app. It's a very nice API by the way. Ok, enough for the introduction. Let's get into the code.

in order to get the route the API we can youse is as follow
http://router.project-osrm.org/table/v1/driving/latitude,longitude;latiude,longitude;latiude,longitude?sources=0


Let me explain this first.
1. The first latitude, longitude is the source/ initial location. Let's say it is the home
2. The second and the third latitude, longitude is the destination. Let's assume it is Post office A, Post Office B, Post Office C. We can add the destination more than one, just simply get the longitude and latitude for each destination and separate it by a semicolon (;).

Requirements
Request module.

Code and explanation:


const request = require("request")

//help array variable
let destination_result = []

//osrm function
const osrm = (addressOrigin, adressDestination, callback) => {
    const url = `http://router.project-osrm.org/table/v1/driving/${addressOrigin};${adressDestination}?sources=0`;
    request({ url, json: true }, (err, res) => {
        if (err) {
            return callback("cannot connect", undefined);
        } else if (res.body.message === "Too Many Requests") {
            callback("too many request, please try again..", undefined);
        } else {
            const destination = res.body.destinations
            destination.forEach((dst, index) => {
                if (index !== 0) {
                    destination_result.push({
                        destination: res.body.destinations[index].location.toString(),
                        duration: res.body.durations[0][index],
                        distance: res.body.destinations[index].distance
                    })
                }
            });

            //SORTING THE NEAREST
            destination_result.sort((a, b) => (a.duration > b.duration) ? 1 : ((b.duration > a.duration) ? -1 : 0));

            console.log('destination result => ', destination_result)

            const result = {
                source: res.body.sources[0].location,
                destination_result
            }
            callback(undefined, result);
            // destination_result = []
        }
    });
};

//for example
const source = '17.060976,51.115321'
const destination = '17.063264,51.114397;17.035318,51.107706;17.039807,51.108434'

//call the function
osrm(source, destination, (err, res) => {
    if (err) {
        return console.log(err)
    }
    console.log(res)
})

I use this API several times, and maybe I can tell you the pros and cons of this API
Pros
- open source
- free
-available documentation

Cons
-the documentation is a bit not "user-friendly"
- sometimes it takes time to load the result
- sometimes their server is "busy" and instead they will return "too many requests". It leads me to refresh my page and service several times

I hope it can help :)

For OSRM you can check here for the more information about the use of this API http://project-osrm.org/docs/v5.5.1/api

Tag:
Node.Js How to Get Shipping Route Using OSRM API, OSRM API, OSRM Node.js, OSRM API, osrm docker, osrm android, osrm install, osrm python, osrm r, osrm frontend, osrm windows, osrm traffic

Node Js Simple Weather App With Geocoding and Yargs

November 14, 2019 Add Comment

It's been quite a while since I left blogging activity. It was because I came back to my country and after that, I must return back to Poland to continue my second semester. Well, to be honest, it's getting harder sometimes in the beginning but Alhamdulillah, I enjoy the process now.

node js weather app, Node Js Simple Weather App, node js weather app github, node js weather app, Node Js Simple Weather App, node js weather app github, node js weather api, node js weather app github node js weather api, node js weather app github, node js weather app, node js weather app, Node Js Simple Weather App, node js weather app, Node Js Simple Weather App, node js weather app github, node js weather app, Node Js Simple Weather App, node js weather app github, node js weather api, node js weather app github node js weather api, node js weather app github, node js weather app, node js weather app, Node Js Simple Weather App, node js weather app github, node js weather api, node js weather app github Node Js Simple Weather App, node js weather app github, node js weather api, node js weather app github node js weather app github, node js weather api, node js weather app github Node Js Simple Weather App, node js weather app github, node js weather api, node js weather app github
Node Js Simple Weather App With Geocoding and Yargs
I have already written 2 articles about How to get Weather information Using free weather API service using Nodejs and How to get information about a specific location using a free geocoding API service. Detail explanation about Free weather API can be accessed here: Node Js Simple Weather App Using Darksky API - Node Js Tutorial and Geocoding here: Node Js Geocoding to get Latitude and Longitude of Address Using Mapbox API - Node Js Tutorial.

So, as we will be using the console, to get the input value we need yargs module for Node js. Yargs module gives us the possibility to get 'advanced input' from the console comparing with argv. To learn about Yargs, you can access here Nodejs Yargs.

Here I have 3 classes
node js weather app, Node Js Simple Weather App, node js weather app github, node js weather app, Node Js Simple Weather App, node js weather app github, node js weather api, node js weather app github node js weather api, node js weather app github, node js weather app, node js weather app, Node Js Simple Weather App, node js weather app, Node Js Simple Weather App, node js weather app github, node js weather app, Node Js Simple Weather App, node js weather app github, node js weather api, node js weather app github node js weather api, node js weather app github, node js weather app, node js weather app, Node Js Simple Weather App, node js weather app github, node js weather api, node js weather app github Node Js Simple Weather App, node js weather app github, node js weather api, node js weather app github node js weather app github, node js weather api, node js weather app github Node Js Simple Weather App, node js weather app github, node js weather api, node js weather app github
classes

App.js - Node Js Simple Weather App With Geocoding and Yargs

This is the main file that will call all the written functions from geo.js and weather.js class.


const geo = require('./geo')
const weather = require('./weather')

const yargs = require('../node_modules/yargs')

//here is the function to call the function from ohter class (geo and weather function)
const myfunc = (location) => {
//1. first we need to load the location
    geo.geo(location, (err, dataLocation) => {
//2. if the the app can retrieve the data from the API server, then we should call the weather function 
        if (err === undefined) {
//3. load the weather function to get the weather information using the longitude and latitude that have been gotten
            weather.weather(dataLocation.lat, dataLocation.long, (err, data) => {
                if (err === undefined) {
//4. print the information
                    console.log('location : ', dataLocation.location)
                    console.log(data)
                } else {
                    console.log(err)
                }
            })
        } else {
//if the location is wrong or cannot retrieve infromation
            console.log(err)
        }
    })
}
//yargs command to get input in console as value
yargs.command({
    command: 'checkweather',
    describe: 'to check the weather...',
    builder: {
        area: {
            describe: 'choose your area..',
            demandOption: true,
            type: 'string'
        }
    },
    handler: function (argv) {
        myfunc(argv.area)
    }
})

yargs.parse()

// seeIt('wroclaw') //you can uncomment this if we don't want to use Yargs module, however you should fill the location manually to the code

Geo.js - Node Js Simple Weather App With Geocoding and Yargs

This file contains all the code needed for geocode configuration.

const request = require('request')

const geo = (place, callback) => {
    const url = `https://api.mapbox.com/geocoding/v5/mapbox.places/${place}.json?limit=1&access_token=pk.eyJ1IjoiemVuaHV6YWluaSIsImEiOiJjanlzeXRobTQwMTZ3M2JwMXFsdXFlbDdsIn0.-MWjWymxxtz1_1BbMPmmRg`
    request({ url, json: true }, (error, response) => {
        if (error) {
            // return console.log('no internet')
            //to return the value then we must use callback
            callback('check your internet', undefined)
        } else if (response.body.features.length == 0) {
            //to return the value then we must use callback
            // return console.log('try other keywords')
            callback('check your keywords or try another keyword', undefined)
        } else {
            const longitude = response.body.features[0].center[0]
            const latitude = response.body.features[0].center[1]
            const exactLocation = response.body.features[0].place_name

            const data = {
                location: exactLocation,
                lat: latitude,
                long: longitude
            }

            // console.log(data)
            //to return the value then we must use callback
            callback(undefined, data)
        }
    })
}

// geo('plac grundwaldzki', (err, res) => {
//     if (err == undefined) {
//         console.log('get the result', res)
//     } else {
//         console.log(err)
//     }
// })

module.exports = { geo: geo }

weather.js - Node Js Simple Weather App With Geocoding and Yargs


This file contains all the code needed for weather configuration.

const request = require('request')

const weather = (longitude, latitude, callback) => {
    const url = `https://api.darksky.net/forecast/8593f986c0f88727f3270a097ee4b90c/${longitude},${latitude}?units=si`
    request({ url, json: true }, (err, response) => {
        if (err) {
            callback('check your internet', undefined)
        } else if (response.body.code == 400) {
            callback('the given location is invalid', undefined)
        } else {
            const data = {
                timezone: response.body.currently.timezone,
                summary: response.body.currently.summary,
                currentTemperature: response.body.currently.temperature,
                humidity: response.body.currently.humidity
            }
            callback(undefined, data)
        }
    })
}

// weather('37.8267', '-122.4233', (err, res) => {
//     if (err == undefined) {
//         console.log(res)
//     } else {
//         console.log(err)
//     }
// })

module.exports = { weather: weather }

How to run it - Node Js Simple Weather App With Geocoding and Yargs

node app.js checkweather --area="your location"
The result
node js weather app, Node Js Simple Weather App, node js weather app github, node js weather app, Node Js Simple Weather App, node js weather app github, node js weather api, node js weather app github node js weather api, node js weather app github, node js weather app, node js weather app, Node Js Simple Weather App, node js weather app, Node Js Simple Weather App, node js weather app github, node js weather app, Node Js Simple Weather App, node js weather app github, node js weather api, node js weather app github node js weather api, node js weather app github, node js weather app, node js weather app, Node Js Simple Weather App, node js weather app github, node js weather api, node js weather app github Node Js Simple Weather App, node js weather app github, node js weather api, node js weather app github node js weather app github, node js weather api, node js weather app github Node Js Simple Weather App, node js weather app github, node js weather api, node js weather app github
result example

I also have aploaded the code on my Github. You can take a look here. Thank you

Keyword:
node js weather app, Node Js Simple Weather App, node js weather app github, node js weather app, Node Js Simple Weather App, node js weather app github, node js weather api, node js weather app github node js weather api, node js weather app github, node js weather app, node js weather app, Node Js Simple Weather App, node js weather app, Node Js Simple Weather App, node js weather app github, node js weather app, Node Js Simple Weather App, node js weather app github, node js weather api, node js weather app github node js weather api, node js weather app github, node js weather app, node js weather app, Node Js Simple Weather App, node js weather app github, node js weather api, node js weather app github Node Js Simple Weather App, node js weather app github, node js weather api, node js weather app github node js weather app github, node js weather api, node js weather app github Node Js Simple Weather App, node js weather app github, node js weather api, node js weather app github

Node Js Geocoding to get Latitude and Longitude of Address Using Mapbox API - Node Js Tutorial

August 02, 2019 Add Comment

After writing an article about Simple Weather App Using Darksky API. In this tutorial, I will share with you guys how to use Geocoding in Node Js using Mapbox API service.

places api nodejs, free geocoding api, free geocoding api nodejs, Node Js Geocoding to get Latitude and Longitude, geocoding api for nodejs, places api nodejs, free geocoding api, free geocoding api nodejs, Node Js Geocoding to get Latitude and Longitude, geocoding api for nodejs
Node Js Geocoding to get Latitude and Longitude of Address Using Mapbox API - Node Js Tutorial

Node Js Geocoding to get Latitude and Longitude of Address Using Mapbox API - Node Js Tutorial

What is Geocoding ?

Geocoding is the process of converting addresses (like a street address, country, or any specific area) into geographic coordinates for example latitude and longitude.

In this tutorial, I will use Mapbox to get the Geocoding service. We have can use the Google Maps API which is way more familiar, why we use Mapbox ?

Mapbox API 

Mapbox is a data platform service for map and location (and it becomes a Google Maps alternative). It can definitely offer detailed, customizable, and interactive maps. Mapbox has many similar feature functionality like Google Maps. Mapbox can provide custom heatmaps, markers, marker clustering, and much more.

Moreover, many says that Mapbox is cheaper than Google Maps, easy to set up, and offers similar (and often better) functionality. Plus, we can make custom maps that can fit the look or design of of site or brand.  However, don't worry because we can also use Mapbox for free (of course with limitation).

How to install

1. Install request module
npm install request

2. Make Account in mapbox.com
Once done, go to this link https://docs.mapbox.com/api/search/#geocoding
you can get your complete link there, like the image below
places api nodejs, free geocoding api, free geocoding api nodejs, Node Js Geocoding to get Latitude and Longitude, geocoding api for nodejs, places api nodejs, free geocoding api, free geocoding api nodejs, Node Js Geocoding to get Latitude and Longitude, geocoding api for nodejs
mapbox documentation

Then you can copy the API url to your app

3. Create app.js and put these codes

//geocoding
const place = 'jakarta'
const mapboxGeocodeUrl = `https://api.mapbox.com/geocoding/v5/mapbox.places/${place}.json?limit=1&access_token=pk.eyJ1IjoiemVuaHV6YWluaSIsImEiOiJjanlzeXRobTQwMTZ3M2JwMXFsdXFlbDdsIn0.-MWjWymxxtz1_1BbMPmmRg`

request({ url: urlGeocoding, json: true }, (error, Response) => {
    if (error) { //this errorr will only show if there is no internet connection
        console.log('check your internet conection..')
    } else if (Response.body.features.length == 0) { // this error will be shown if our query search of an address, country or etc. is nowhere to be found
        console.log('cek your query to determine the area, we cannot return the information!')
    } else {
        const longitude = Response.body.features[0].center[0];
        const latitude = Response.body.features[0].center[1]
        console.log('longitude => ' + longitude)
        console.log('latitude => ' + latitude)
    }
})

4. run in the console
node app.js


you can check this project in my github https://github.com/ZenHuzaini/nodejs-geocoding


In the next tutorial I will try to combine the Geocoding result (latitude and longitude) from Mapbox and use it to get more dynamic weather information.

tag : places api nodejs, free geocoding api, free geocoding api nodejs, Node Js Geocoding to get Latitude and Longitude, geocoding api for nodejs, places api nodejs, free geocoding api, free geocoding api nodejs, Node Js Geocoding to get Latitude and Longitude, geocoding api for nodejs

Node Js Simple Weather App Using Darksky API - Node Js Tutorial

July 31, 2019 Add Comment

Hi, after coping with my real life and those 'tiring' daily activities, finally I can write again.
in this tutorial I will share with you guys how to access darksky api using node js.

Node Js Simple Weather App Using Darksky API, weather app node js, node js darksky, darksky api, node js weather app simple
Node Js Simple Weather App Using Darksky API 

Node Js Simple Weather App Using Darksky API 

What module we need to accees ?

as we are going to access the API from other site and make http request, a module called request is needed. What is request module for node js ? according to stackabuse.com,  The request module is by far the most popular (non-standard) Node package for making HTTP requests. It means that HTTP requests with Node.js are a means for fetching data from a remote source. It could be an API, a website, or something else: at one point you will need some code to get meaningful data from one of those remote sources - valentinog.com.

And what is Darksky API ?

Darksky API is one of API provider for weather forecast. Why Darksky API ? because its it can be configured easily in minutes, developer friendly, clear and concise documentation. It also provides forecasts and current conditions, global coverage, historical data, and severe weather alerts

Here is the example of Node Js Simple Weather App Using Darksky API


const request = require('request')

const url = 'https://api.darksky.net/forecast/8593f986c0f88727f3270a097ee4b90c/37.8267,-122.4233?units=si'
//'https://api.darksky.net/forecast/8593f986c0f88727f3270a097ee4b90c/37.8267,-122.4233' to customize add ? followed with the keyvalue=value
//example 'https://api.darksky.net/forecast/8593f986c0f88727f3270a097ee4b90c/37.8267,-122.4233?units=si&ang=id'
//read https://darksky.net/dev/docs

const getWeather = () => {
    request({ url: url, json: true }, (error, response) => { //json true to enable automatic json parsing
        // const data = JSON.parse(response.body) // it is used if json option is not enabled / json: not true ..which is to change json string to json
        // console.log(response.body)
        console.log(`overall, the weather today is ${response.body.currently.summary} with the temperature of ${response.body.currently.temperature} celcius `)
        console.log(`and right now is ${response.body.minutely.summary} .. and current precip intensity is ${response.body.minutely.data[0].precipIntensity}`)
    })
}

getWeather()


you can see in my github for more:

I hope it can be useful for you :)

Tag: Node Js Simple Weather App Using Darksky API, weather app node js, node js darksky, darksky api, node js weather app simple

Introduction to Basic JavaScript & First Step to Learn JavaScript - JavaScript Tutorial

July 21, 2019 Add Comment

Javascript is a programming language that you must learn if you want to explore the world of web development.

Currently javascript is not only used on the client (browser) side. Javascript is also used on servers, consoles, desktop programs, mobile, IoT, games, and others.

This makes javascript more popular and becomes the most used language on Github. According to hybridtechcar.com, JavaScript is the most used programming language in 2018.

JavaScript Tutorial - Introduction to Basic JavaScript & First Step to Learn JavaScript, learn javascript, learn javascript for beginner, javascript for beginners, how to learn javascript for beginners, javascript examples, javascript introduction, javascript tutorial, javascript for beginner, javascript for beginners udemy, javascript syntax, learn javascript, learn javascript, learn javascript for beginner, javascript for beginners, how to learn javascript for beginners, javascript examples, javascript introduction, javascript tutorial, javascript for beginner, javascript for beginners udemy, javascript syntax, learn javascript
programming trends - Introduction to Basic JavaScript & First Step to Learn JavaScript - JavaScript Tutorial

In this article, we will learn Javascript from the basic. Starting from the introduction of Javascript, to make the first program with Javascript.

Introduction to Basic JavaScript & First Step to Learn JavaScript - JavaScript Tutorial

What is JavaScript ?

Javascript is a programming language that was originally designed to run on a browser.

However, as time goes by, javascript does not only run on the browser. Javascript can also be used on the server side, games, IoT, desktop, etc.

Javascript was originally called Mocha, then changed to LiveScript when the browser Netscape Navigator 2.0 was released in beta (September 1995). However, after that it was renamed Javascript.

Inspired by the success of Javascript, Microsoft adopted a similar technology. Microsoft made their own version of 'JavaScript' called JScript. Then planted on Internet Explorer 3.0.

This has resulted in 'browser wars', because Microsoft's JScript is different from Netscape's Javascript.

Tools To Learn JavaScript

What are the equipment that must be prepared to learn Javascript?
1. Web Browser (Google Chrome, Firefox, Opera, etc.)
2. Text Editor (recommendation: VS Code)

That is all?

Yes, that's enough. If you want to learn Javacript from Nodejs, please read: Introduction to Nodejs for Beginners.

My recommendation: learn Javascript from the client side first. and thenNodejs later.

Get to know the JavaScript Console

Some say, learning javascript is difficult, because when you see the results in a web browser, the error message does not appear. This opinion is incorrect. Because we can see it through the console.

We can open the Javascript Console through Inspect Element-> Console.

Inside the console, we can write functions or javascript codes and the results will be immediately displayed.

For example, let's try the following code:

console.log("Hi apa kabar!");
alert("Saya sedang belajar javascript");

Then the results will be like
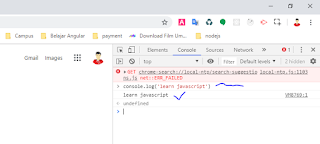
When we write console.log(''learn javascript)
JavaScript Tutorial - Introduction to Basic JavaScript & First Step to Learn JavaScript, learn javascript, learn javascript for beginner, javascript for beginners, how to learn javascript for beginners, javascript examples, javascript introduction, javascript tutorial, javascript for beginner, javascript for beginners udemy, javascript syntax, learn javascript, learn javascript, learn javascript for beginner, javascript for beginners, how to learn javascript for beginners, javascript examples, javascript introduction, javascript tutorial, javascript for beginner, javascript for beginners udemy, javascript syntax, learn javascript
console in browser - Introduction to Basic JavaScript & First Step to Learn JavaScript - JavaScript Tutorial

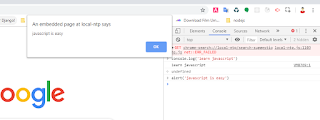
and if we write alert('javascript is easy), here is the outcome
JavaScript Tutorial - Introduction to Basic JavaScript & First Step to Learn JavaScript, learn javascript, learn javascript for beginner, javascript for beginners, how to learn javascript for beginners, javascript examples, javascript introduction, javascript tutorial, javascript for beginner, javascript for beginners udemy, javascript syntax, learn javascript, learn javascript, learn javascript for beginner, javascript for beginners, how to learn javascript for beginners, javascript examples, javascript introduction, javascript tutorial, javascript for beginner, javascript for beginners udemy, javascript syntax, learn javascript
console in browser and pop up alert - Introduction to Basic JavaScript & First Step to Learn JavaScript - JavaScript Tutorial

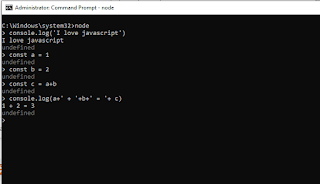
If you use Nodejs, then how to access the console is to type the command node in the Terminal. we can see like the picture below.
JavaScript Tutorial - Introduction to Basic JavaScript & First Step to Learn JavaScript, learn javascript, learn javascript for beginner, javascript for beginners, how to learn javascript for beginners, javascript examples, javascript introduction, javascript tutorial, javascript for beginner, javascript for beginners udemy, javascript syntax, learn javascript, learn javascript, learn javascript for beginner, javascript for beginners, how to learn javascript for beginners, javascript examples, javascript introduction, javascript tutorial, javascript for beginner, javascript for beginners udemy, javascript syntax, learn javascript
using node js in console - Introduction to Basic JavaScript & First Step to Learn JavaScript - JavaScript Tutorial

However, in order to be able to run node, we have to install nodejs first. Please read How to Install Node Js

After trying the Javascript console, we can conclude that:
1. The console can be used to test functions or Javascript code;
2. We can use the Console to see error messages when debugging programs.

Creating the First Javascript Program

Already know how to open and use a javascript console?

Nice…

Then, let's create the first program with Javascript.

Please open the text editor, I strongly recommend you to use Visual Studio Code. Then create a file called helloWorld.html and write in the following code:

<!DOCTYPE html>
<html>

<head>
    <title>Hello World Javascript</title>
</head>

<body>
    <script>
        console.log("now I love Javascript@");
        document.write("Hello World!");
    </script>
</body>

</html>

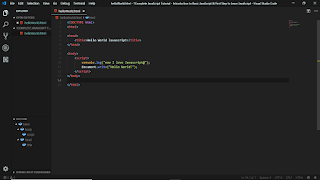
if you are using Visual studio code the image will be like this
JavaScript Tutorial - Introduction to Basic JavaScript & First Step to Learn JavaScript, learn javascript, learn javascript for beginner, javascript for beginners, how to learn javascript for beginners, javascript examples, javascript introduction, javascript tutorial, javascript for beginner, javascript for beginners udemy, javascript syntax, learn javascript, learn javascript, learn javascript for beginner, javascript for beginners, how to learn javascript for beginners, javascript examples, javascript introduction, javascript tutorial, javascript for beginner, javascript for beginners udemy, javascript syntax, learn javascript
hello world html - Introduction to Basic JavaScript & First Step to Learn JavaScript - JavaScript Tutorial
Please save it with the name helloWorld.html, then open the file with a web browser.
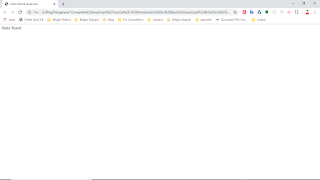
and the result will be like ..
JavaScript Tutorial - Introduction to Basic JavaScript & First Step to Learn JavaScript, learn javascript, learn javascript for beginner, javascript for beginners, how to learn javascript for beginners, javascript examples, javascript introduction, javascript tutorial, javascript for beginner, javascript for beginners udemy, javascript syntax, learn javascript, learn javascript, learn javascript for beginner, javascript for beginners, how to learn javascript for beginners, javascript examples, javascript introduction, javascript tutorial, javascript for beginner, javascript for beginners udemy, javascript syntax, learn javascript
result from helloWorld.html - Introduction to Basic JavaScript & First Step to Learn JavaScript - JavaScript Tutorial

Wait a minute ...

Remember that we wrote the command:
console.log("now I love Javascript!");

Why isn't it displayed?

Because the command or function console.log() will display messages in the javascript console. While the document.write() command functions to write to an HTML document, then it will be displayed there.

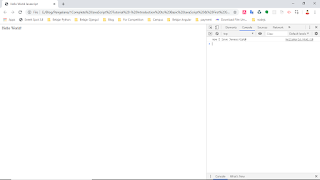
Now just open the javascript console.

Then we will see the message "now I love Javascript!"
JavaScript Tutorial - Introduction to Basic JavaScript & First Step to Learn JavaScript, learn javascript, learn javascript for beginner, javascript for beginners, how to learn javascript for beginners, javascript examples, javascript introduction, javascript tutorial, javascript for beginner, javascript for beginners udemy, javascript syntax, learn javascript, learn javascript, learn javascript for beginner, javascript for beginners, how to learn javascript for beginners, javascript examples, javascript introduction, javascript tutorial, javascript for beginner, javascript for beginners udemy, javascript syntax, learn javascript
result in console - Introduction to Basic JavaScript & First Step to Learn JavaScript - JavaScript Tutorial


Cool!

Now, what we need to know next is:

How to write Javascript code in HTML?

In the example above, we have written javascript code in HTML.

This method is an embeded method.

There are still some more ways that we need to know:
1. Embed (Javascript code pasted directly on HTML. Example: the one before)
2. Inline (Javascript code written in HTML attributes)
3. External (Javascript code is written separately from HTML file)

Let's look at an example ...

1. Writing javascript code with Embed

In this way, we use the <script> tag to embed the Javascript code in HTML. This tag can be written in the <head> and <body> tags.

Example:

<!DOCTYPE html>
<html>

<head>
    <title>learn Javascript from basic</title>
    <script>
        // this is how to write javascript code
        // inside <head> tag
        console.log("Hello, this is JavaScript from Head");
    </script>
</head>

<body>
    <p>Tutorial Javascript for beginner</p>
    <script>
        // this is how to write javascript code
        // inside <body> tag
        console.log("Hello, this JavaScript from body");
    </script>
</body>

</html>

Which is better, write the javascript code in <head> or <body>?

Many says that writing it in <body> is better, because it will make the web load faster.

2. Writing inline javascript code

In this way, we will write the javascript code in the HTML attribute. This method is usually used to call a function for a particular event.

For example: when the link is clicked -> we want something to happen if we click it

Example:
<a href="#" onclick="alert('Yey!')">click me!</a>

Or that can also be like this
<a href="javascript:alert('Yey!')">Click me!</a>

You can put the code inside the helloWorld.html

<!DOCTYPE html>
<html>

<head>
    <title>Learn Javascript from the basic</title>
    <script>
        // this is how to write javascript code
        // inside <head> tag
        console.log("Hello, this is JavaScript from Head");
    </script>
</head>

<body>
    <p>Javascript tutorial for beginner</p>
    <script>
        // this is how to write javascript code
        // inside <body> tag
        console.log("Hello, this JavaScript from body");
    </script>

    <a href="#" onclick="alert('Yey!')">click me!</a>
    <a href="#" onclick="alert('Yey!')">click me again!</a>
</body>

</html>

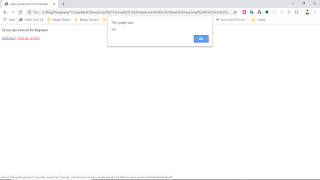
and the result will be like this
JavaScript Tutorial - Introduction to Basic JavaScript & First Step to Learn JavaScript, learn javascript, learn javascript for beginner, javascript for beginners, how to learn javascript for beginners, javascript examples, javascript introduction, javascript tutorial, javascript for beginner, javascript for beginners udemy, javascript syntax, learn javascript, learn javascript, learn javascript for beginner, javascript for beginners, how to learn javascript for beginners, javascript examples, javascript introduction, javascript tutorial, javascript for beginner, javascript for beginners udemy, javascript syntax, learn javascript
result in browser - Introduction to Basic JavaScript & First Step to Learn JavaScript - JavaScript Tutorial

Look...

In the onclick and href attributes we write the javascript function there.

The onclick attribute is an HTML attribute to declare a function that will be executed when the element is clicked.

In the example above, we run the alert () function. This function is a function for displaying dialogs.

Then in the href attribute, we also call the alert () function with javascript:

The href attribute is actually used to fill in the link address or URL.

Because we want to call the javascript code there, then we change the link address to javascript: then followed by the function to be called.

3. Writing External JavaScript Code

In this way, we will write the javascript code separately with the HTML file.

This method is usually used on large projects, because it is believed - in this way - it can more easily manage the project code.

Let's look at an example ...

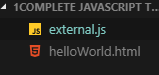
We create two files, HTML and Javascript files.
JavaScript Tutorial - Introduction to Basic JavaScript & First Step to Learn JavaScript, learn javascript, learn javascript for beginner, javascript for beginners, how to learn javascript for beginners, javascript examples, javascript introduction, javascript tutorial, javascript for beginner, javascript for beginners udemy, javascript syntax, learn javascript, learn javascript, learn javascript for beginner, javascript for beginners, how to learn javascript for beginners, javascript examples, javascript introduction, javascript tutorial, javascript for beginner, javascript for beginners udemy, javascript syntax, learn javascript
folder structure - Introduction to Basic JavaScript & First Step to Learn JavaScript - JavaScript Tutorial
inside external.js we can write:
alert("Hello, this is from Javascript external");

from helloWorld.html :
<! DOCTYPE html>
<html>
    <head>
        <title> Learning JavaScript from Zero </title>
    </head>
    <body>
        <p> JavaScript Tutorial for Beginners </p>

        <!-- Insert external js code -->
        <script src="external.js"> </script>
    </body>
</html>

And the result will be like this
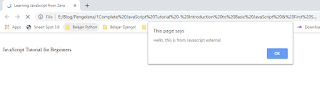
JavaScript Tutorial - Introduction to Basic JavaScript & First Step to Learn JavaScript, learn javascript, learn javascript for beginner, javascript for beginners, how to learn javascript for beginners, javascript examples, javascript introduction, javascript tutorial, javascript for beginner, javascript for beginners udemy, javascript syntax, learn javascript, learn javascript, learn javascript for beginner, javascript for beginners, how to learn javascript for beginners, javascript examples, javascript introduction, javascript tutorial, javascript for beginner, javascript for beginners udemy, javascript syntax, learn javascript
result in browser - Introduction to Basic JavaScript & First Step to Learn JavaScript - JavaScript Tutorial
In the example above, we write separate javascript code with HTML code.

Then, in the HTML code ...

We insert it by giving the src attribute to the <script> tag.
<!-- embed javascript external code -->
<script src="external.js"></script>

So, anything in the external.js file will be read from the helloWorld.html file.

What if the javascript file is in a different folder?
We can write the full address of the folder.

Example:
Suppose we have a folder structure like this:
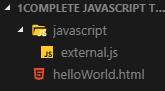
JavaScript Tutorial - Introduction to Basic JavaScript & First Step to Learn JavaScript, learn javascript, learn javascript for beginner, javascript for beginners, how to learn javascript for beginners, javascript examples, javascript introduction, javascript tutorial, javascript for beginner, javascript for beginners udemy, javascript syntax, learn javascript, learn javascript, learn javascript for beginner, javascript for beginners, how to learn javascript for beginners, javascript examples, javascript introduction, javascript tutorial, javascript for beginner, javascript for beginners udemy, javascript syntax, learn javascript
folder structure - Introduction to Basic JavaScript & First Step to Learn JavaScript - JavaScript Tutorial
So to insert the external.js file into HTML, we can write it like this:
<script src="javascript/external.js"></script>

Because the external.js file is in the javascript directory.

We can also insert javascript on the internet by providing the full URL address.
<script src="https://www.pengelanamuslim.com/javascript/code.js"></script>

What is next?
Congratulations 🎉

You already know JavaScript and have made the first program with Javascript.

Of course this is not enough ...

We still have to learn a lot about Javascript. InshaAllah, I will try to write more about javascript tutorials.. . see you!
source: petanikode.com